[DEV] Airflow Celery Executor
[DEV] Airflow Celery Executor
Celery Executor 아키텍처
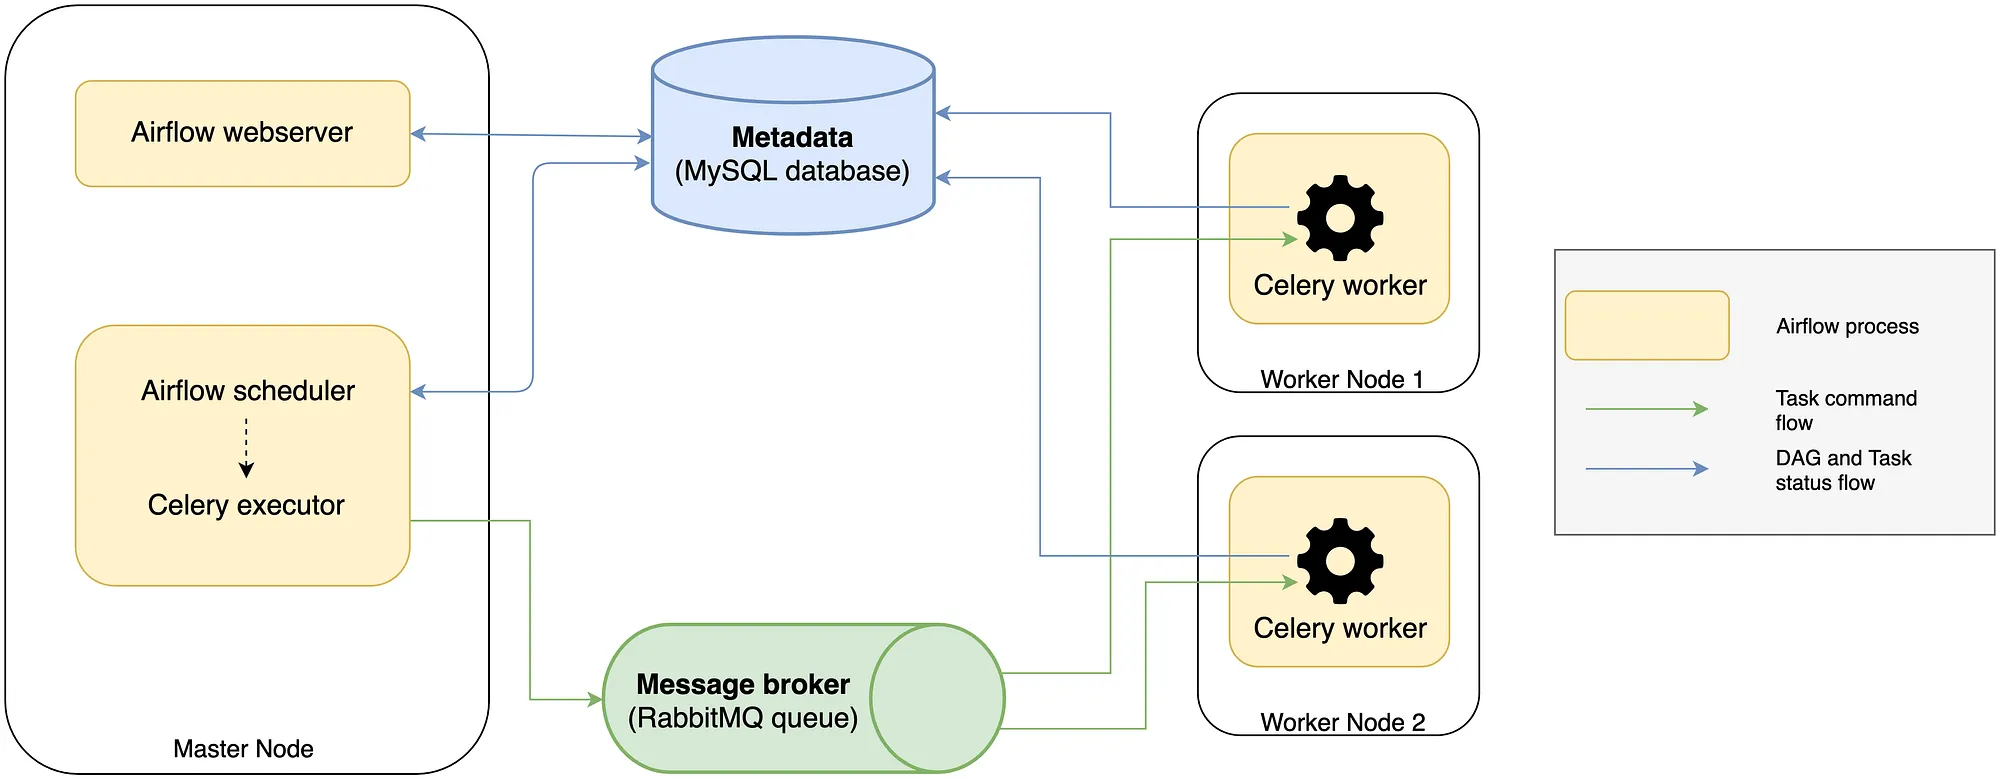
출처: https://medium.com/sicara/using-airflow-with-celery-workers-54cb5212d405
- 웹서버
- Airflow의 UI를 제공하는 Flask 기반 웹 애플리케이션
- UI를 통해 DAG 모니터링, Task 상태 확인, 커넥션 추가 등 시스템을 수동으로 제어할 수 있음
- 스케줄러
- DAG 정의 파일을 주기적으로 파싱하여 실행 조건이 충족된 Task를 식별하고, 이를 메시지 브로커의 큐 (Queue)로 전송
- Task를 직접 실행하지 않고, Celery Worker에게 작업을 지시하는 역할
- Airflow 2.0부터는 여러 스케줄러를 동시 실행하여 고가용성 구성이 가능해짐
- 메타데이터 데이터베이스
- DAG, Task 인스턴스, 커넥션, 변수 등 Airflow의 모든 상태 정보 저장
- PostgreSQL 같은 RDBMS를 주로 사용함
- 메시지 브로커
- 스케줄러와 Celery Worker 간의 통신을 중개하는 비동기 메시징 시스템
- 스케줄러가 보낸 Task 메시지를 큐에 임시 저장했다가, 유휴 상태의 Worker에게 전달하는 역할
- 주로 Redis 또는 RabbitMQ 사용
- Celery Workers
- 실제 Task를 실행하는 일꾼 프로세스
- 메시지 브로커의 큐를 지속적으로 Listen 하다가 새로운 Task가 들어오면 이를 가져와 수행함 (Dequeue)
- Worker는 여러 서버에 분산하여 배치할 수 있으며, 이 노드들을 추가하는 것만으로 손쉽게 전체 시스템의 처리량을 늘릴 수 있음 (수평 확장)
- Result Backend
- Celery Worker가 Task 실행을 마친 후, 그 결과를 저장하는 공간 (실패, 성공, 반환 값 등)
- 스케줄러와 웹서버는 이 백엔드를 조회하여 Task의 최종 상태를 메타데이터 데이터베이스에 업데이트함
- 일반적으로 Airflow의 메타데이터 데이터베이스 또는 메시지 브로커를 그대로 사용함
데이터 흐름 요약:
스케줄러 → (Task 메시지) → 메시지 브로커 (Queue) → (Task 메시지) → Celery 워커 → (Task 실행) → 결과 백엔드 → (상태 업데이트) → 메타데이터 DB
Celery Executor 구축 과정
GCP Infra
- VM 머신: Compute Engine
- Debian 12
- e2-highmem-2 (vCPU 2, 메모리 16GB)
- 메타데이터 데이터베이스: Cloud SQL
- PostgreSQL 17
- vCPU 1, 메모리 3.75GB
- SSD 10GB
- 메시지 브로커: Redis
- VM에 직접 설치
- 로깅: Cloud Storage에 별도 저장
- VM 머신의 디스크 사용량을 줄이기 위함
- 클라우드 인프라 구성은 terraform을 이용했습니다.
- Compute Engine, Cloud SQL, Cloud Storage, Load Balancer, SSL Cert
- state backend는 GCS 버킷에 저장합니다.
main.tf
1
2
3
4
5
6
7
8
9
10
11
12
13
14
15
16
17
18
19
20
21
22
23
24
25
26
27
28
29
30
31
32
33
34
35
36
37
38
39
40
41
42
43
44
45
46
47
48
49
50
51
52
53
54
55
56
57
58
59
60
61
62
63
64
65
66
67
68
69
70
71
72
73
74
75
76
77
78
79
80
81
82
83
84
85
86
87
88
89
90
91
92
93
94
95
96
97
98
99
100
101
102
103
104
105
106
107
108
109
110
111
112
113
114
115
116
117
118
119
120
121
122
123
124
125
126
127
128
129
130
131
132
133
134
135
136
137
138
139
140
141
142
143
144
145
146
147
148
149
150
151
152
153
154
155
156
157
158
159
160
161
162
163
164
165
166
167
168
169
170
171
172
173
174
175
176
177
178
179
180
181
182
183
184
185
186
187
188
189
190
191
192
193
194
195
196
197
198
199
200
201
202
203
204
205
206
207
208
209
210
211
212
213
214
215
216
217
218
219
220
221
222
223
224
225
226
227
228
229
230
231
232
233
234
235
236
237
238
239
240
241
242
243
244
  # GCP 프로젝트 변수
  variable "project_id" {
    type        = string
    default     = "{project_id}"
    description = "GCP 프로젝트 ID"
  }

  variable "region" {
    type        = string
    default     = "asia-northeast3"
    description = "GCP 리전"
  }

  # Compute Engine 변수
  variable "vm_name" {
    type        = string
    default     = "{instance_name}"
    description = "Compute Engine VM 이름"
  }

  variable "vm_machine_type" {
    type        = string
    default     = "e2-highmem-2"
    description = "VM 머신 타입"
  }

  # Cloud SQL 변수
  variable "db_instance_name" {
    type        = string
    default     = "{sql_instance_name}"
    description = "Cloud SQL 인스턴스 이름"
  }


  # GCS 변수
  variable "logs_bucket_name" {
    type        = string
    default     = "{bucket_name}"
    description = "Airflow 로그용 GCS 버킷 이름"
  }

  # 로드밸런서 및 SSL 변수
  variable "domain_name" {
    type        = string
    default     = "{domain}"
    description = "Airflow 웹서버용 도메인 이름"
  }

  provider "google" {
    project = var.project_id
    region  = var.region
  }

  # Compute Engine VM
  resource "google_compute_instance" "airflow_vm" {
    name         = var.vm_name
    machine_type = var.vm_machine_type
    zone         = "${var.region}-a"

    boot_disk {
      initialize_params {
        image = "debian-cloud/debian-12"
        type  = "pd-standard"
      }
    }

    network_interface {
      network = "default"
      access_config {
        // Ephemeral public IP
      }
    }

    service_account {
      email  = "service-executor@${var.project_id}.iam.gserviceaccount.com"
      scopes = ["cloud-platform"]
    }

    metadata = {
      enable-oslogin = "TRUE"
    }

    tags = ["airflow-vm", "allow-lb-backend"]
  }

  # Cloud SQL PostgreSQL 인스턴스
  resource "google_sql_database_instance" "airflow_db" {
    name                = var.db_instance_name
    database_version    = "POSTGRES_17"
    region              = var.region

    settings {
      edition = "ENTERPRISE"
      tier = "db-custom-1-3840"

      disk_size = 10
      disk_type = "PD_SSD"

      backup_configuration {
        enabled = true
        start_time = "02:00"
        point_in_time_recovery_enabled = true

        backup_retention_settings {
          retained_backups = 7
          retention_unit = "COUNT"
        }
      }

      # 인스턴스 삭제 시 최종 백업 설정
      final_backup_config {
        enabled = true
        retention_days = 30
      }
    }

    deletion_protection = false
  }

  # GCS 버킷 (로그용)
  resource "google_storage_bucket" "airflow_logs" {
    name       = var.logs_bucket_name
    location   = var.region

    uniform_bucket_level_access = true

    versioning {
      enabled = true
    }

    lifecycle_rule {
      condition {
        age = 30
      }
      action {
        type = "Delete"
      }
    }
  }


  # 로드밸런서용 정적 IP
  resource "google_compute_global_address" "airflow_lb_ip" {
    name = "airflow-lb-ip"
  }

  # 헬스체크 - Airflow 웹서버 상태 확인
  resource "google_compute_health_check" "airflow_health_check" {
    name = "airflow-health-check"

    timeout_sec         = 10
    check_interval_sec  = 10
    healthy_threshold   = 3
    unhealthy_threshold = 3

    http_health_check {
      port         = "80"
      request_path = "/health"
    }
  }

  # 인스턴스 그룹
  resource "google_compute_instance_group" "airflow_ig" {
    name = "airflow-instance-group"
    zone = "${var.region}-a"

    instances = [
      google_compute_instance.airflow_vm.id
    ]

    named_port {
      name = "http"
      port = "80"
    }
  }

  # 백엔드 서비스 - 로드밸런서가 트래픽을 전달할 대상
  resource "google_compute_backend_service" "airflow_backend" {
    name        = "airflow-backend-service"
    protocol    = "HTTP"
    timeout_sec = 30

    health_checks = [google_compute_health_check.airflow_health_check.id]

    backend {
      group = google_compute_instance_group.airflow_ig.id
    }
  }

  # HTTP → HTTPS 리다이렉트 URL 맵
  resource "google_compute_url_map" "airflow_http_redirect" {
    name = "airflow-http-redirect"

    default_url_redirect {
      redirect_response_code = "MOVED_PERMANENTLY_DEFAULT"
      https_redirect         = true
      strip_query            = false
    }
  }

  # HTTPS URL 맵 - 요청을 백엔드 서비스로 라우팅
  resource "google_compute_url_map" "airflow_url_map" {
    name            = "airflow-url-map"
    default_service = google_compute_backend_service.airflow_backend.id
  }

  # HTTPS 프록시 - SSL 종료
  resource "google_compute_target_https_proxy" "airflow_https_proxy" {
    name    = "airflow-https-proxy"
    url_map = google_compute_url_map.airflow_url_map.id

    ssl_certificates = [google_compute_managed_ssl_certificate.airflow_ssl.id]
  }

  # HTTP 프록시 - HTTP → HTTPS 리다이렉트용
  resource "google_compute_target_http_proxy" "airflow_http_proxy" {
    name    = "airflow-http-proxy"
    url_map = google_compute_url_map.airflow_http_redirect.id
  }

  # 관리형 SSL 인증서
  resource "google_compute_managed_ssl_certificate" "airflow_ssl" {
    name = "airflow-ssl-cert"

    managed {
      domains = [var.domain_name]
    }
  }

  # 글로벌 전달 규칙 - HTTPS
  resource "google_compute_global_forwarding_rule" "airflow_https_forwarding" {
    name       = "airflow-https-forwarding-rule"
    target     = google_compute_target_https_proxy.airflow_https_proxy.id
    port_range = "443"
    ip_address = google_compute_global_address.airflow_lb_ip.id
  }

  # 글로벌 전달 규칙 - HTTP (리다이렉트용)
  resource "google_compute_global_forwarding_rule" "airflow_http_forwarding" {
    name       = "airflow-http-forwarding-rule"
    target     = google_compute_target_http_proxy.airflow_http_proxy.id
    port_range = "80"
    ip_address = google_compute_global_address.airflow_lb_ip.id
  }
</details>
VM 환경 구성
- Python
- pyenv를 사용하여 가상환경을 구성합니다.
- 버전은 3.11.13 을 사용합니다.
- Airflow
- 버전은 2.10.5 를 사용합니다.
- 필요한 패키지들을 함께 설치합니다.
1
2
pip install "apache-airflow[standard,google,celery,redis,postgres,ssh,statsd,slack]==2.10.5" \
  --constraint "https://raw.githubusercontent.com/apache/airflow/constraints-2.10.5/constraints-3.11.txt"
- AIRFLOW_HOME
- DAG가 저장되어 있는 GitHub 레포지토리를 Clone한 뒤, 해당 경로를 AIRFLOW_HOME 환경변수로 설정합니다.
dags,data,plugins폴더로 구성합니다.
- Redis
- 버전은 7.0.15 를 사용합니다.
1
2
3
4
5
6
7
8
9
10
# 설치
sudo apt update
sudo apt install redis-server -y

# 서비스 활성화
sudo systemctl enable redis-server
sudo systemctl start redis-server

# redis python 패키지 설치
pip install redis celery[redis]
- Debian의 경우 설정 파일은
/etc/redis/redis.conf에 위치합니다. 아래 설정을 변경하여 비밀번호를 설정할 수 있습니다.- 설정 후 Redis 서버를 재시작합니다.
sudo systemctl restart redis-server1
requirepass {password}
- 설정 후 Redis 서버를 재시작합니다.
- VM 인스턴스 1대로 구성하고 있기 때문에 bind 설정은 127.0.0.1로 유지합니다.
1
2
3
4
5
6
7
8
# 접속 테스트
redis-cli -a {password} ping

# task 목록
redis-cli -a {password} KEYS "celery-task-meta-*"

# 메타데이터 확인
redis-cli -a {password} GET "celery-task-meta-새로운작업ID"
- 버전은 7.0.15 를 사용합니다.
Airflow 설정
- AIRFLOW_HOME으로 이동하여
airflow db init을 수행하면, airflow.cfg 파일이 생성됩니다. - 해당 파일을 수정하여 설정을 변경합니다.
- database 설정
1
2
[database]
sql_alchemy_conn = postgresql+psycopg2://{username}:{password}@{cloud_sql_ip}/{database}
- core 설정
1
2
3
4
[core]
executor = CeleryExecutor

load_examples = False
- logging 설정
1
2
3
4
5
6
7
8
9
10
11
12
13
14
15
16
[logging]
base_log_folder = {$AIRFLOW_HOME}/logs

remote_logging = True

delete_local_logs = True

remote_log_conn_id = {gcs_connection_id}

remote_log_folder = gs://{gcs_bucket_name}/logs

log_filename_template = ///.log

log_format = %%(asctime)s - %%(name)s - %%(levelname)s - %%(message)s

simple_log_format = %%(asctime)s - %%(name)s - %%(levelname)s - %%(message)s
- 외부 버킷에 로그를 저장하기 위해서** base_log_folder, remote_logging, delete_local_logs, remote_log_conn_id, remote_log_folder** 설정이 필요합니다.
- base_log_folder (로컬 VM 머신) 에 먼저 로그를 쌓은 뒤, Task가 종료되면 remote_log_folder로 로그를 복사하고 로컬의 로그를 삭제합니다.
- api 설정
1
auth_backends = airflow.api.auth.backend.session- 웹 서버에 접근할 때 사용하는 인증 방식을 기본 인증으로 지정합니다. (아이디, 비밀번호)
- 비밀번호가 암호화되지 않기 때문에 HTTPS와 함께 사용해야 합니다.
- webserver 설정
1
2
3
4
5
6
7
8
[webserver]
workers = 2

default_ui_timezone = Asia/Seoul

base_url = https://{domain}

rate_limit_storage_uri = redis://{password}@localhost:6379/1
rate_limit_storage_uri설정은 웹서버의 요청 횟수 제한 상태를 저장할 저장소 주소를 지정합니다. 주로 Redis를 사용합니다.- 브루트 포스 공격과 Dos 공격으로부터 보호하기 위해 사용됩니다.
- 공격을 방지하기 위해 특정 IP가 1분 동안 몇 번 요청했는지와 같은 상태 정보를 저장하고 추적해야하는데, 이때 사용될 데이터베이스를 지정하는 설정입니다.
- 이미 메시지 브로커로 Redis를 사용하고 있기 때문에, 데이터가 섞이지 않도록 /1 등 다른 DB 번호를 사용합니다.
- scheduler 설정
1
2
[scheduler]
enable_health_check = True
- celery 설정
1
2
3
4
5
6
7
8
9
10
11
12
[celery]
broker_url = redis://{password}@localhost:6379/0
result_backend = redis://{password}@localhost:6379/2

worker_prefetch_multiplier = 1
task_acks_late = True
task_track_started = True
task_send_sent_event = True
task_soft_time_limit = 3600
task_time_limit = 3600

worker_concurrency = 4
broker_url설정은 메시지 브로커의 주소입니다. 로컬에 설치된 Redis의 0번 DB를 사용합니다.result_backend설정은 result backend 를 저장할 DB 주소입니다. Redis의 2번 DB를 사용합니다.task_acks_late설정은 워커가 Task를 언제 ‘처리 완료’ 로 간주할지 결정하는 옵션입니다.- True로 설정한 경우, 워커가 Task를 성공적으로 완료한 후에야 메시지 큐에 Task 완료를 알립니다. 만약 워커가 Task를 처리하던 중 장애로 갑자기 종료되면 메시지 큐에는 해당 Task가 여전히 처리중인 상태로 남아있게 되어, 다른 워커가 Task를 가져가 다시 실행할 수 있습니다. 데이터 무결성이 중요한 경우 True로 설정하는 것이 좋습니다.
- 기본값인 False를 유지하는 경우에는 워커가 Task를 가져가는 즉시 처리 완료로 설정됩니다. 이 경우 처리 중 장애가 발생하면 해당 Task는 유실됩니다.
task_soft_time_limit,task_time_limit설정은 특정 Task가 비정상적으로 오래 실행되어 시스템 전체에 영향을 주는 것을 방지하는 Timeout 설정입니다.task_soft_time_limit은 Celery에서 SoftTimeLimitExceeded 예외를 발생시키게 됩니다. 코드에서 이 예외를 잡아서 로그를 남기거나 리소스를 정리하는 등 graceful shutdown을 시도할 수 있습니다.task_time_limit은 Celery에서 SIGKILL 신호를 보내 해당 Task를 실행하는 프로세스를 강제로 종료합니다.
task_track_started를 True로 설정하면 Task가 “실행 시작” 상태일 때, 그 상태를 결과 백엔드에 기록합니다. Airflow UI에서 Task 상태가 ‘queued’ → ‘success’ 로 바뀌는 것이 아니라, ‘queued’ → ’running’ → ‘success’ 로 바뀌어 더욱 상세한 모니터링이 가능합니다.task_send_sent_event는 스케줄러가 워커에서 Task를 성공적으로 보냈을 때 ‘sent’ 이벤트를 발생시킬지 여부를 결정합니다. Flower와 같은 Celery 모니터링 도구에서 주로 사용되어 Task의 전체 생명주기를 더 정확하게 추적하고 시각화해줍니다.worker_prefetch_multiplier는 워커가 자신의 동시성 (concurrency)에 기반하여 한 번에 몇 개의 Task를 미리 가져올지 결정하는 배수입니다.- 공식: concurrency * prefetch_multiplier
- 실행 시간이 긴 Task가 적은 수로 존재한다면 1~2 정도로 보수적으로 설정하고, 실행 시간이 짧은 Task가 수천 개씩 있다면 4 또는 8 정도로 높여서 네트워크 통신 오버헤드를 줄이고 전체 처리량을 높일 수 있습니다.
worker_concurrency는 단일 Celery 워커 프로세스가 동시에 실행할 수 있는 Task의 최대 개수를 지정합니다. 이 값은 워커가 실행되는 서버의 CPU 코어 수와 메모리, Task의 리소스 사용량을 고려하여 설정합니다.- CPU-bound Task 위주: 서버의 CPU 코어 수와 비슷하게 설정합니다.
- I/O-bound Task 위주 (API 호출, DB 조회 등): CPU 코어 수의 1.5~2배 이상으로 설정하여 I/O 대기 시간 동안 다른 Task를 처리하도록 할 수 있습니다.
Airflow 사용자 생성
1
2
3
4
5
6
7
8
9
10
11
12
13
14
15
16
GENERATED_PASSWORD=$(openssl rand -base64 12)
echo "Generated password: $GENERATED_PASSWORD"

# 생성된 비밀번호로 사용자 생성
airflow users create \
    --username {username} \
    --firstname {firstname} \
    --lastname {lastname} \
    --role Admin \
    --email {email} \
    --password "$GENERATED_PASSWORD"

# 사용자 비밀번호 변경
airflow users reset-password \
    --username dev \
    --password {new_password}
Systemd Service 생성
systemd service로 airflow를 구성하여 쉽고 안정적으로 서비스를 운영합니다.
airflow-worker@.service
1
2
3
4
5
6
7
8
9
10
11
12
13
14
15
16
17
18
19
20
[Unit]
Description=Airflow Celery Worker %i
After=network.target postgresql.service redis-server.service
Wants=redis-server.service
Documentation=https://airflow.apache.org/docs/

[Service]
User={username}
Group={group}
Type=simple
EnvironmentFile={$AIRFLOW_HOME}/environment

# 'airflow' 래퍼 대신 'celery' 직접 실행하여 Worker 별 hostname 지정
ExecStart=/home/{username}/.pyenv/versions/.venv/bin/celery -A airflow.providers.celery.executors.celery_executor.app worker --loglevel INFO -E --hostname 'worker%i@%H' --queues default

Restart=always
RestartSec=5s

[Install]
WantedBy=multi-user.target
- 하나의 VM 머신에서 여러 워커 프로세스를 실행하려면 airflow wrapper 대신 celery로 직접 실행해야합니다.
- 워커 프로세스 노드 이름이 고유해야 하는데, airflow wrapper는
%i와 같은 템플릿 변수를 제대로 파싱할 수 없기 때문에 고유한 노드 이름이 생성되지 않습니다.
airflow-webserver.service
1
2
3
4
5
6
7
8
9
10
11
12
13
14
15
16
[Unit]
Description=Airflow Webserver Daemon
After=network.target postgresql.service redis-server.service
Documentation=https://airflow.apache.org/docs/

[Service]
User={username}
Group={group}
Type=simple
EnvironmentFile={$AIRFLOW_HOME}/environment
ExecStart=/home/{username}/.pyenv/versions/.venv/bin/airflow webserver --port 80
Restart=always
RestartSec=5s

[Install]
WantedBy=multi-user.target
airflow-scheduler.service
1
2
3
4
5
6
7
8
9
10
11
12
13
14
15
16
[Unit]
Description=Airflow Scheduler Daemon
After=network.target postgresql.service redis-server.service
Documentation=https://airflow.apache.org/docs/

[Service]
User={username}
Group={group}
Type=simple
EnvironmentFile={$AIRFLOW_HOME}/environment
ExecStart=/home/{username}/.pyenv/versions/.venv/bin/airflow scheduler
Restart=always
RestartSec=5s

[Install]
WantedBy=multi-user.target
airflow-flower.service
1
2
3
4
5
6
7
8
9
10
11
12
13
14
15
[Unit]
Description=Airflow Celery Flower
After=network.target redis-server.service

[Service]
User={username}
Group={group}
Type=simple
EnvironmentFile={$AIRFLOW_HOME}/environment
ExecStart=/home/{username}/.pyenv/versions/.venv/bin/airflow celery flower --port=5555 --host=0.0.0.0
Restart=always
RestartSec=5s

[Install]
WantedBy=multi-user.target
service 시작
1
2
3
4
5
6
7
sudo systemctl daemon-reload

sudo systemctl enable airflow-worker@{1,2} airflow-worker airflow-scheduler airflow-flower

sudo systemctl start airflow-worker@{1,2} airflow-worker airflow-scheduler airflow-flower

sudo systemctl status 'airflow-worker@*.service'
DAG 배포 자동화
- 배포 자동화는 GCP Cloud Build를 사용합니다.
- main 브랜치에 push가 되면
git pull origin main→ airflow service들을 모두 재시작합니다. - Cloud Build에서 VM 인스턴스에 접근하기 위해 Worker Pool과 SSH Key를 사용했습니다.
- SSH Key는 VM에서 직접 생성한 뒤 Secret Manager에 저장해두었고, 배포 과정에서 Secret Manger를 읽어 Key를 가져와서 VM에 접근합니다.
배포 스크립트는 yaml 파일로 구성합니다.
1
2
3
4
5
6
7
8
9
10
11
12
13
14
15
16
17
18
19
20
21
22
23
24
25
26
27
28
29
30
31
32
33
34
35
36
37
38
39
40
41
42
43
44
45
46
47
48
49
50
51
52
53
54
55
56
57
58
59
60
61
62
63
64
65
66
67
68
69
70
71
72
73
74
75
76
77
78
79
80
81
82
83
84
85
86
87
88
89
90
91
# deploy/deploy_to_vm.cloudbuild.yaml
# Worker Pool을 사용한 내부 IP 접속

options:
  pool:
    name: 'projects/{gcp_project_id}/locations/asia-northeast3/workerPools/{worker_pool_name}'
  logging: CLOUD_LOGGING_ONLY

steps:
  - name: 'gcr.io/cloud-builders/gcloud'
    entrypoint: 'bash'
    args:
      - '-c'
      - |
        echo "=== Worker Pool을 사용한 VM 배포 시작 ==="

        # Secret Manager에서 SSH 키 가져오기
        echo "SSH 키 설정 중..."
        mkdir -p /root/.ssh
        gcloud secrets versions access latest --secret="{secret_manager_key}" > /root/.ssh/id_rsa
        chmod 600 /root/.ssh/id_rsa

        # SSH 설정
        cat > /root/.ssh/config << EOF
        Host *
          StrictHostKeyChecking no
          UserKnownHostsFile=/dev/null
          LogLevel=DEBUG3
        EOF

        # VM 내부 IP 가져오기
        VM_INTERNAL_IP=$(gcloud compute instances describe ${_VM_NAME} --zone=${_VM_ZONE} --format="value(networkInterfaces[0].networkIP)")
        echo "VM 내부 IP: $VM_INTERNAL_IP"

        # SSH 명령 실행 (내부 IP 사용)
        echo "SSH를 통한 VM 접속 및 배포 시작..."
        ssh -i /root/.ssh/id_rsa ${_VM_USER}@$VM_INTERNAL_IP '
          set -e

          echo "VM 내부에서 작업 시작..."

          # 작업 디렉토리로 이동
          cd ${_AIRFLOW_HOME}
          echo "작업 디렉토리: $(pwd)"

          # Git 저장소 업데이트
          echo "Git 저장소 업데이트 중..."
          if ! git pull origin main; then
            echo "ERROR: Git pull 실패"
            exit 1
          fi
          echo "Git 저장소 업데이트 완료"

          # Airflow 서비스 재시작
          echo "Airflow 서비스 상태 확인 중..."
          if systemctl is-active --quiet airflow-webserver 2>/dev/null; then
            echo "Airflow 서비스 재시작 중..."
            if ! sudo systemctl restart airflow-webserver; then
              echo "ERROR: airflow-webserver 재시작 실패"
              exit 1
            fi
            if ! sudo systemctl restart airflow-scheduler; then
              echo "ERROR: airflow-scheduler 재시작 실패"
              exit 1
            fi
            if ! sudo systemctl restart airflow-worker; then
              echo "ERROR: airflow-worker 재시작 실패"
              exit 1
            fi
            echo "Airflow 서비스 재시작 완료"
          else
            echo "WARNING: Airflow 서비스가 실행 중이지 않습니다."
          fi

          echo "배포 완료!"
        '

        if [[ $? -eq 0 ]]; then
          echo "✅ VM 코드 배포가 성공적으로 완료되었습니다."
        else
          echo "❌ VM 배포 실패"
          exit 1
        fi

substitutions:
  _AIRFLOW_HOME: "{airflow_home}"
  _VM_NAME: "{vm_instance_name}"
  _VM_ZONE: "asia-northeast3-a"
  _VM_USER: "{vm_username}"

timeout: '600s'
</details>
This post is licensed under CC BY 4.0 by the author.